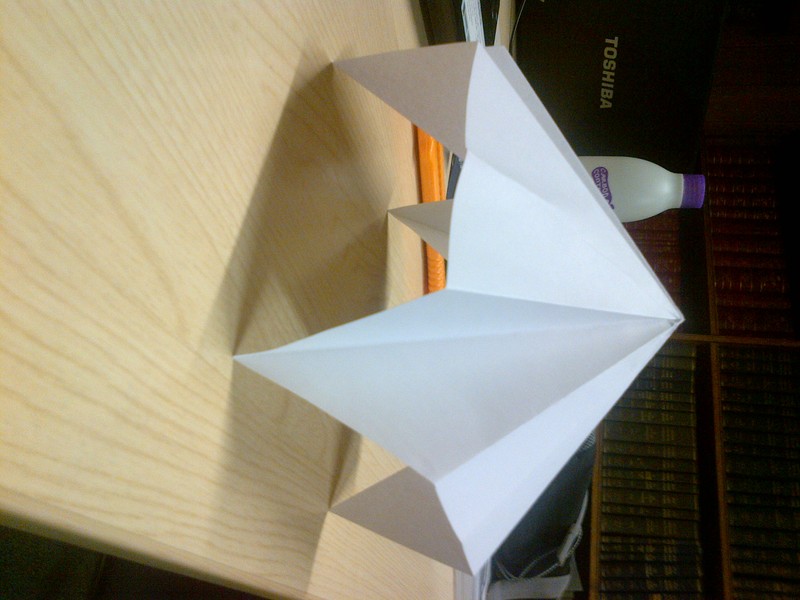
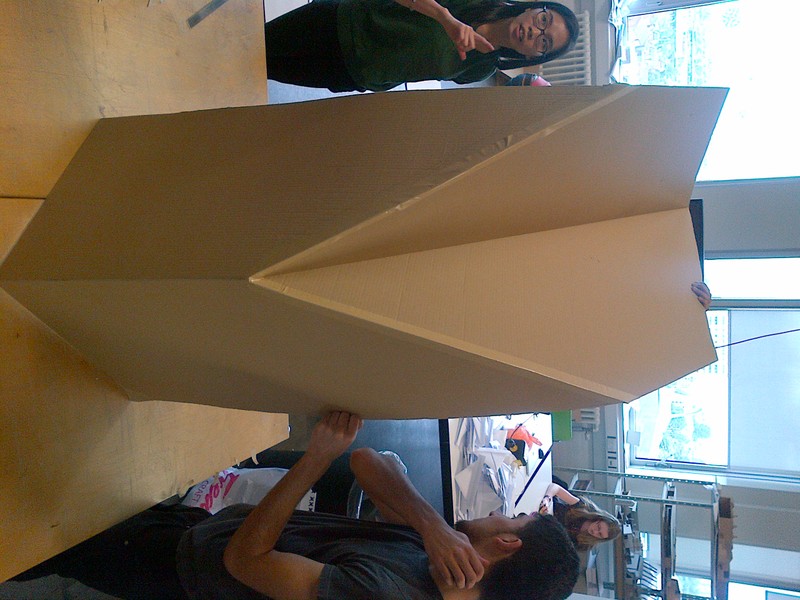
Our final task was to make a presentation model that could show the upright position of our card structure. We made this out of one piece of card and folded it into shape.
Posted 17 May 2014 15:33
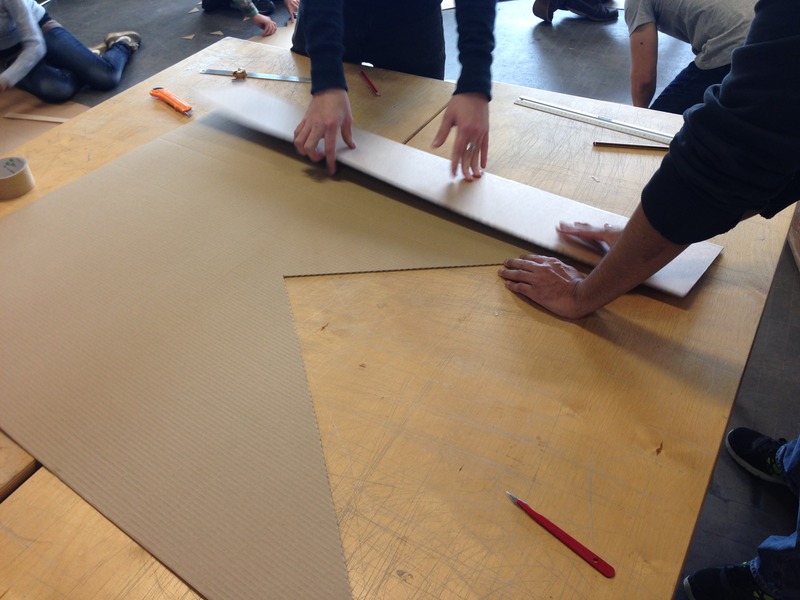
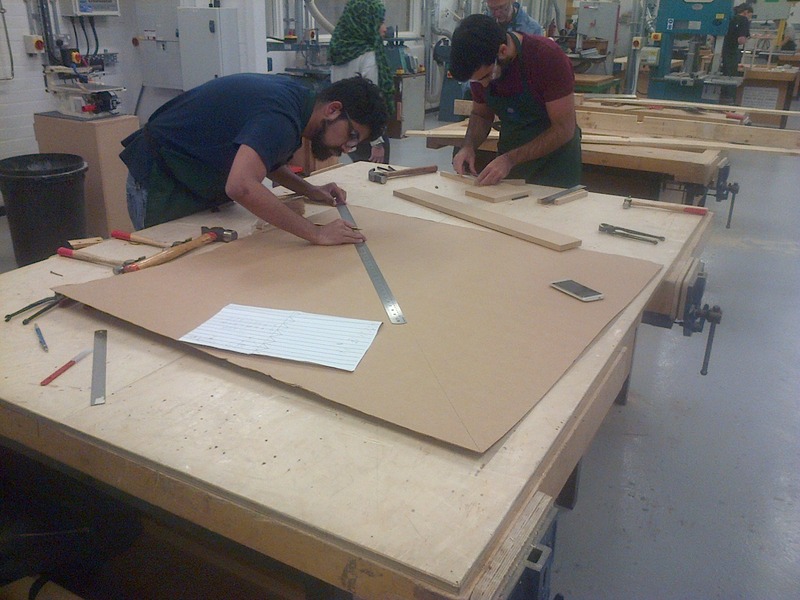
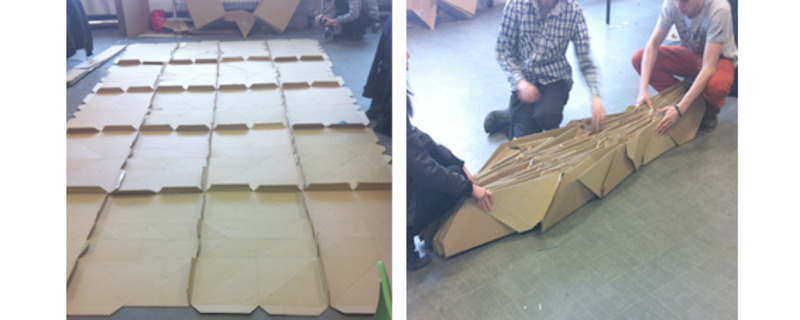
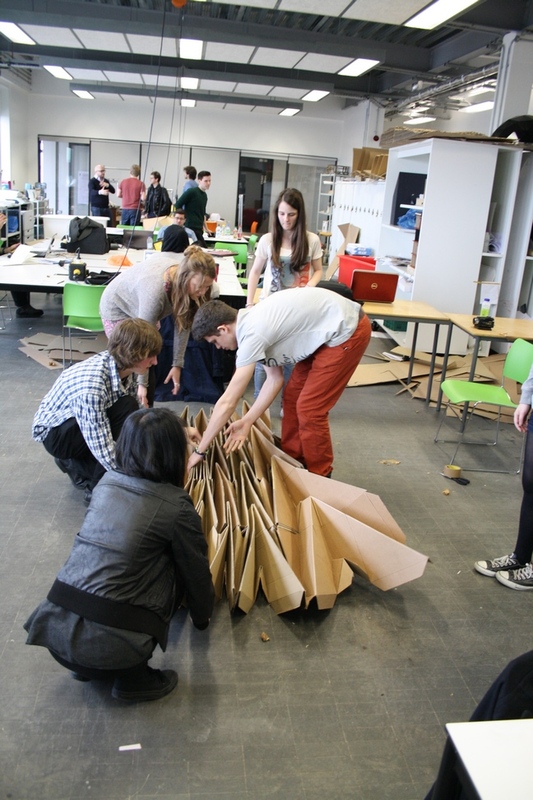
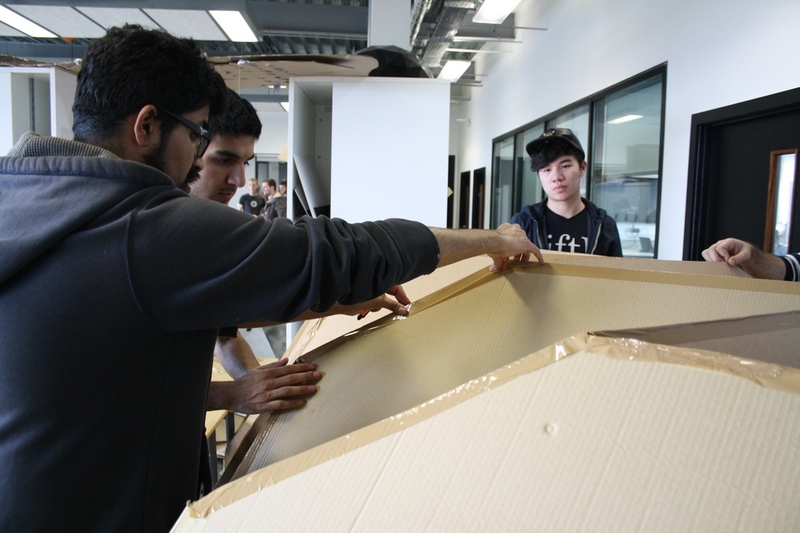
We started construction on day four. Our design fitted into a grid with 4 rows and 5 columns of 600mm by 900mm each of these pieces is scored to create our origami design. The sections were attached with staples and tape on the tabs.
Posted 17 May 2014 00:04
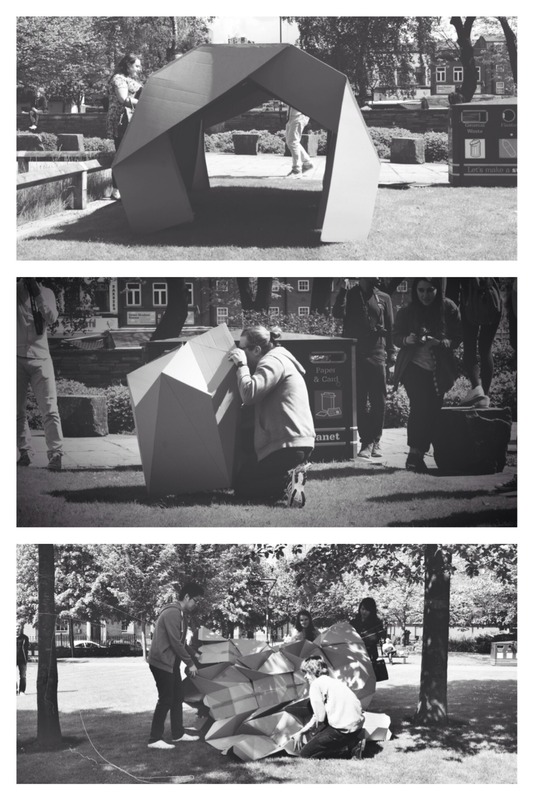
out in the park asking pedestrian to test the shelter. a reason for a good laugh during exam period, seems like our shelter was the most sussessful at easy to set up. unfortunatly the shelter broke after a few trials.
Posted 17 May 2014 00:00
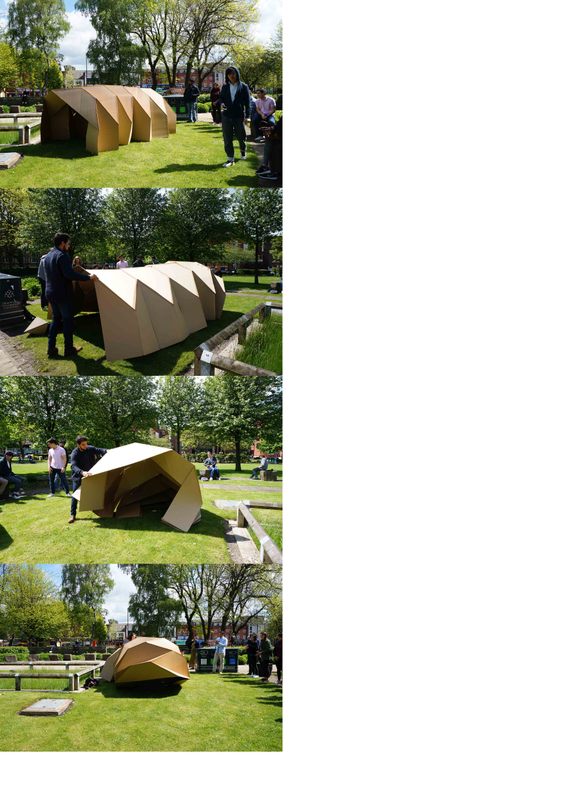
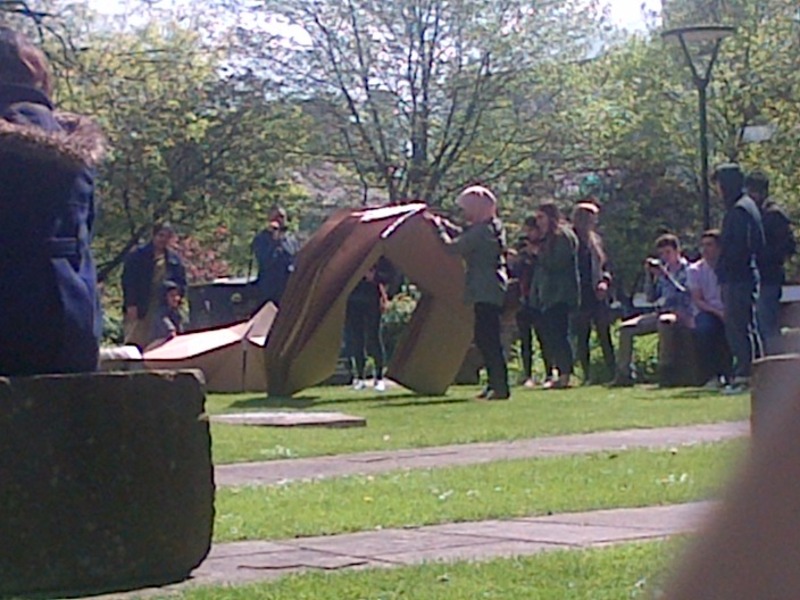
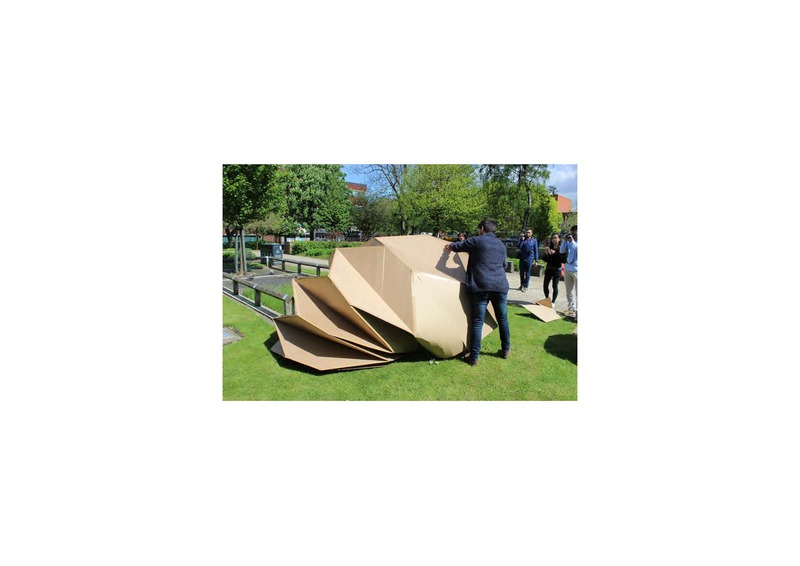
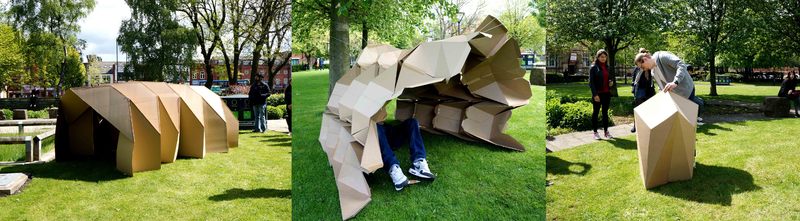
Erecting our shelter in All Saints Park. With the help of a passer by, we expanded our shelter over string between two trees.
Posted 16 May 2014 23:59
1:1 model finished, the bigger model actually fold better then the smaller model. looking forward to let people test it tomorrow
Posted 16 May 2014 23:54
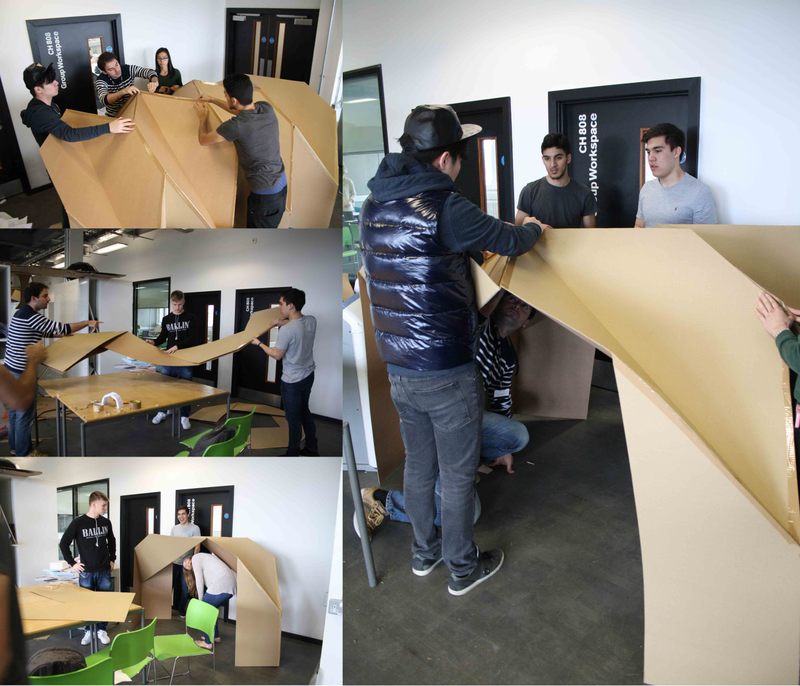
building 1:1 model, taking a lot of people and space. haha
Posted 16 May 2014 23:52
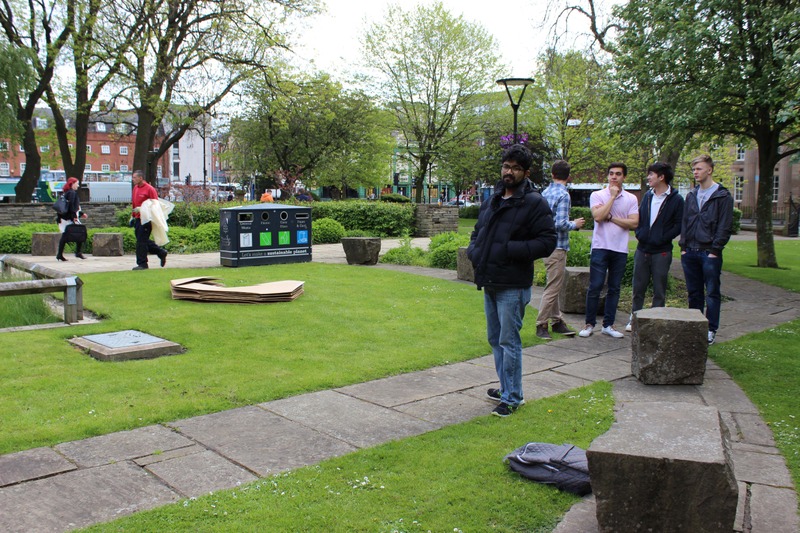
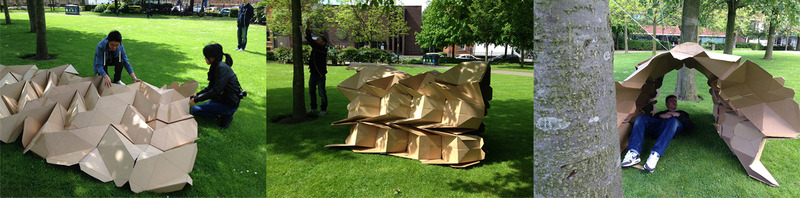
Day 6: We took a trip to All Saints park in the sunshine to test the shelters out in real, outside conditions, and to get the public to interact with them, to allow us to get feedback on our designs.
Posted 16 May 2014 23:52
Day 5: We practised contstructing and deconstructing our shelters, documenting ease of use in case of a disaster and asked fellow students to try.
Posted 16 May 2014 23:50
Day 4: After refining our designs, we began building the at a bigger scale
Posted 16 May 2014 23:48
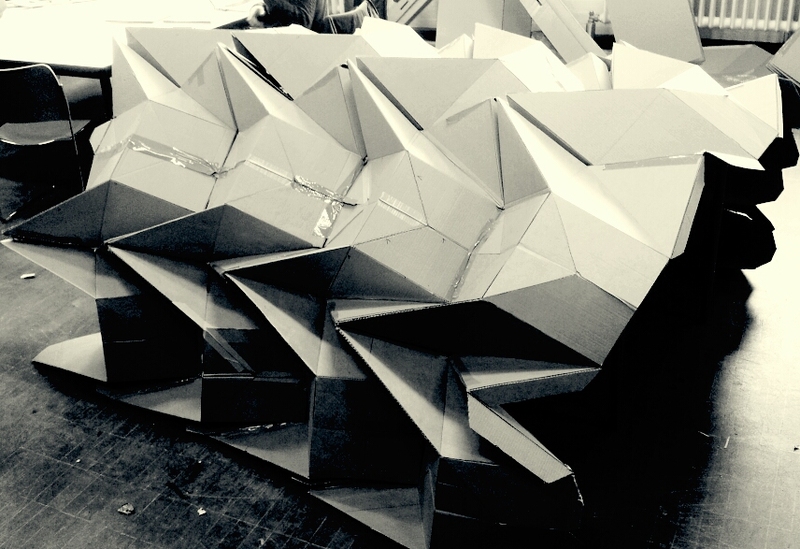
1:1 honey comb partial model. not looking as nice as we expected but it explains the foldability well!
Posted 16 May 2014 23:39
unfortunately, the honey comb design wasn't able to be build 1:1 due to the cost and complication. however, lecturers gave many realistic advise and lots is learned.
Posted 16 May 2014 23:34
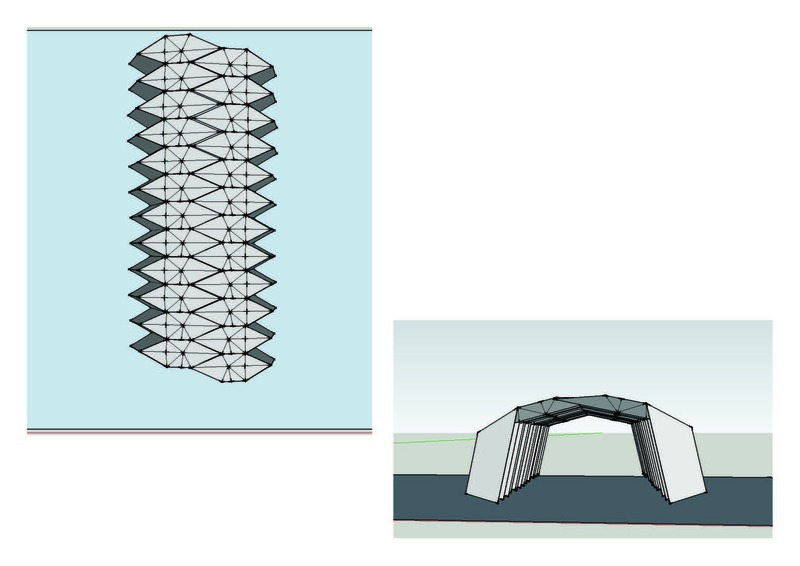
Before presenting our Design we made a 1:1 component to show how the design expands and flattens. I also used the SketchUp model to give an impression of how the shelter might be used.
Posted 16 May 2014 23:32
drawing is harder then making!!after many mathematical calculations, first 3d prototype model finished and rendered.
Posted 16 May 2014 23:30
First prototype of honeycomb model!!lets hope it get selected for the 1:1 model.
Posted 16 May 2014 23:26
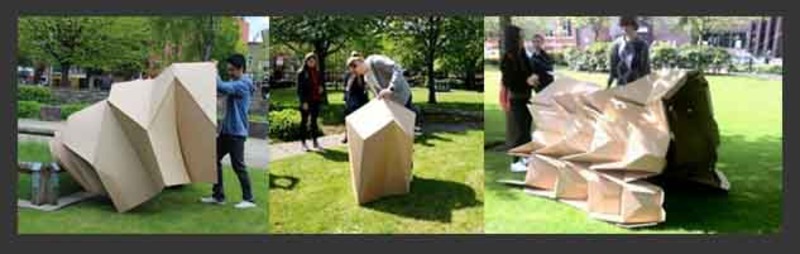
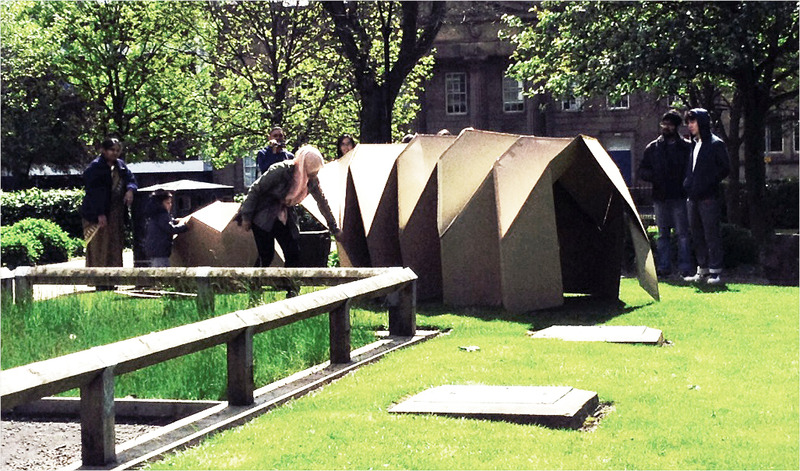
People trying to erect shelter in All Saint's Park.
Posted 16 May 2014 18:47
Shelter folded. As it would be when packed to be deployed in disaster areas. It was essential that design was compact.
Posted 16 May 2014 18:39
Final model completed. Individual cardboard panel measurements (1.1m by 1.1m) meant that we could not design as high as we wanted to. Otherwise, design came together well.
Posted 16 May 2014 18:36
Constructing initial prototype to confirm measurements. A 'flat section' was created in the beginning to see whether it would fit together precisely. After this all we had to do was duplicate that section five times, and finally join them together.
Posted 16 May 2014 18:27
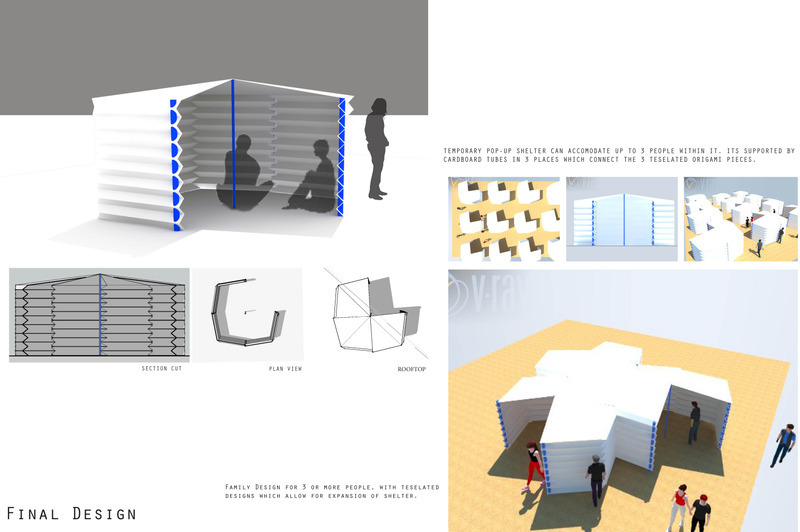
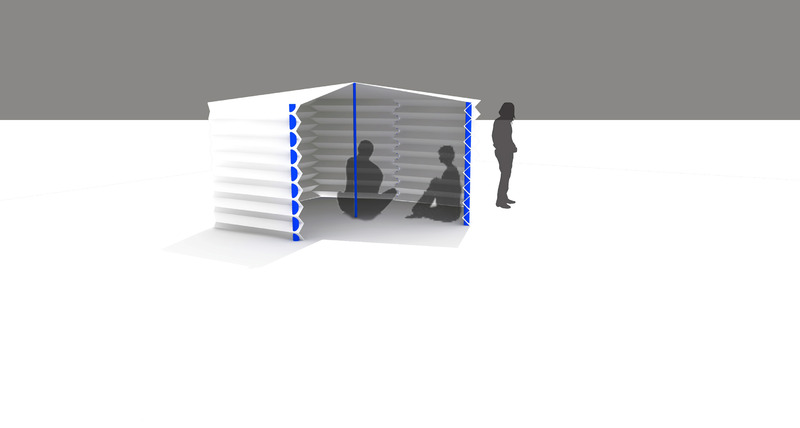
Designing final model in Sketchup.
Posted 16 May 2014 18:23
Designing final model in Sketch up. This was necessary for confirming measurements of pieces as well as angles, and to remain within given parameters of the brief. (total area: 9m square)
Posted 16 May 2014 18:23
Finalising design for 1:1 construction. Three designs were finalised from which one had to be chosen for full scale construction. We took part in a presentation, explaining our ideas, and ended up choosing the design on the right.
Posted 16 May 2014 18:14
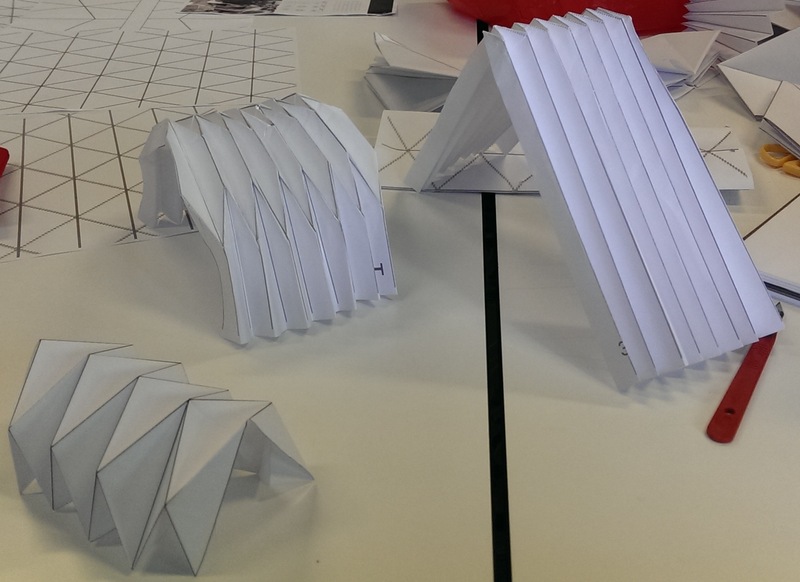
First day, Origami folding practice. Some templates were given in the brief while some other designs were also tried out during the day.
Posted 16 May 2014 18:09
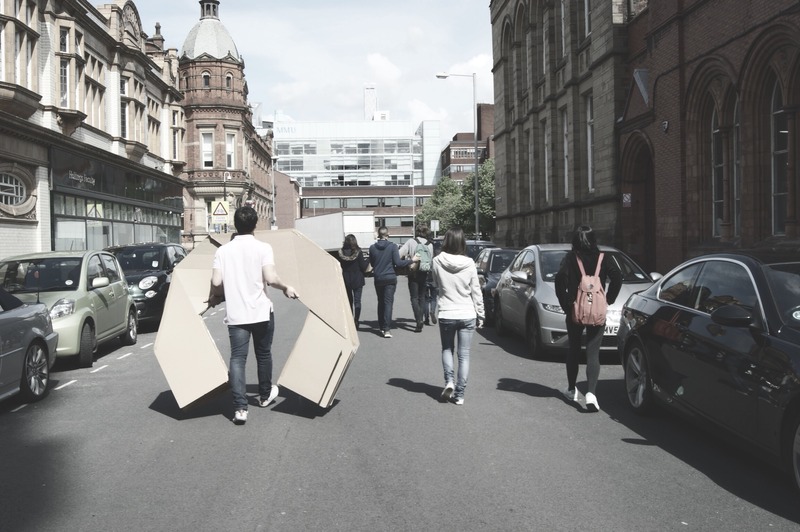
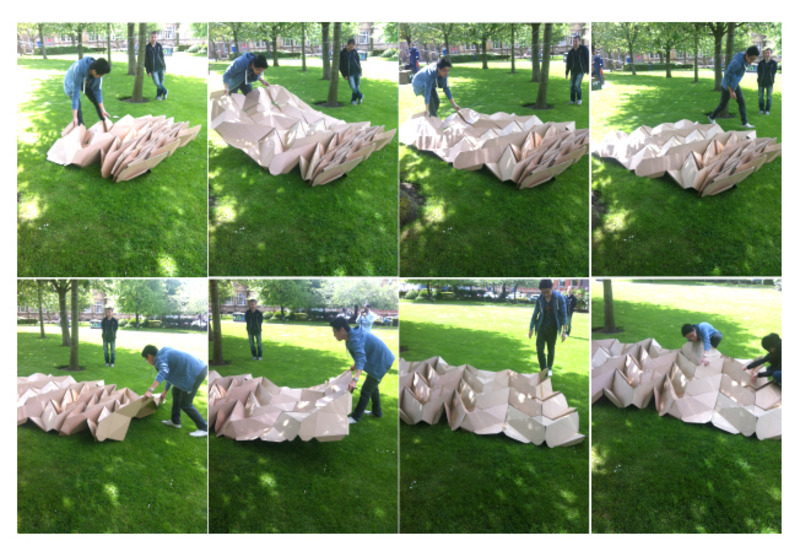
DAY 7 // We asked members of the public to assemble our shelters. One of the designs was really easy and they did not need any help, however the other two we had to step in and give them a hand on how to construct the shelters.
Posted 16 May 2014 16:54
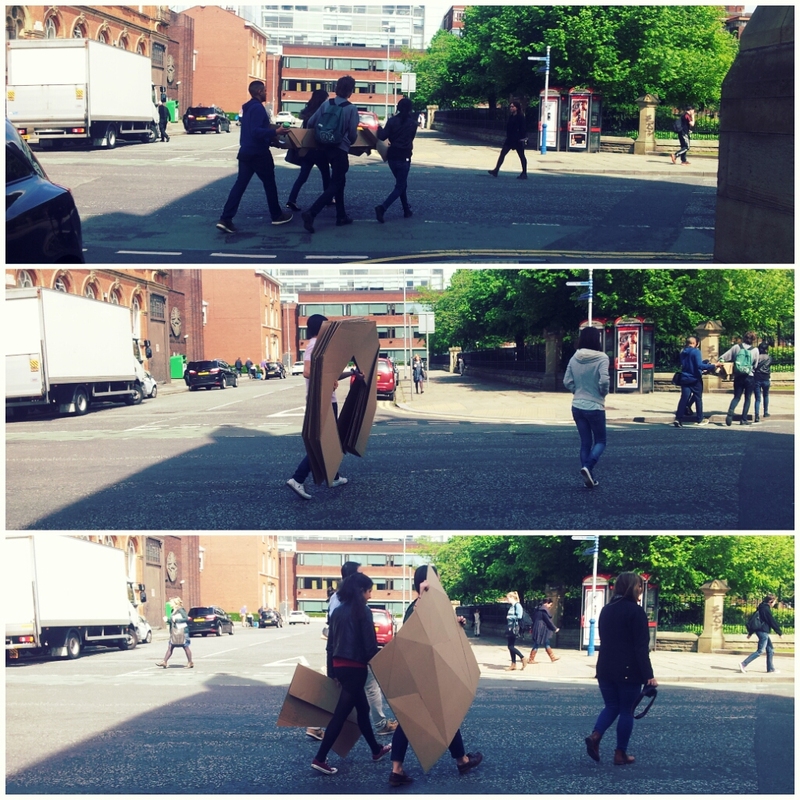
DAY 7 // We carried our shelters over to All Saints park to ask passers by to try and erect the shelter without any instructions.
Posted 16 May 2014 16:41
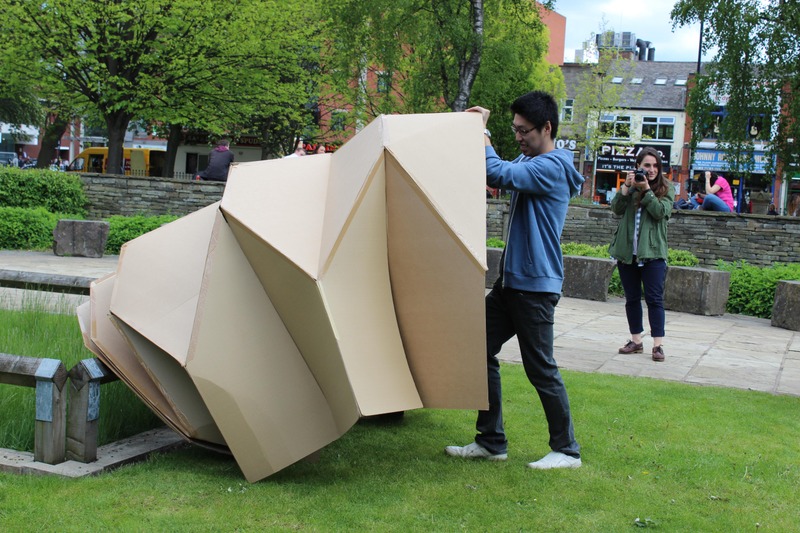
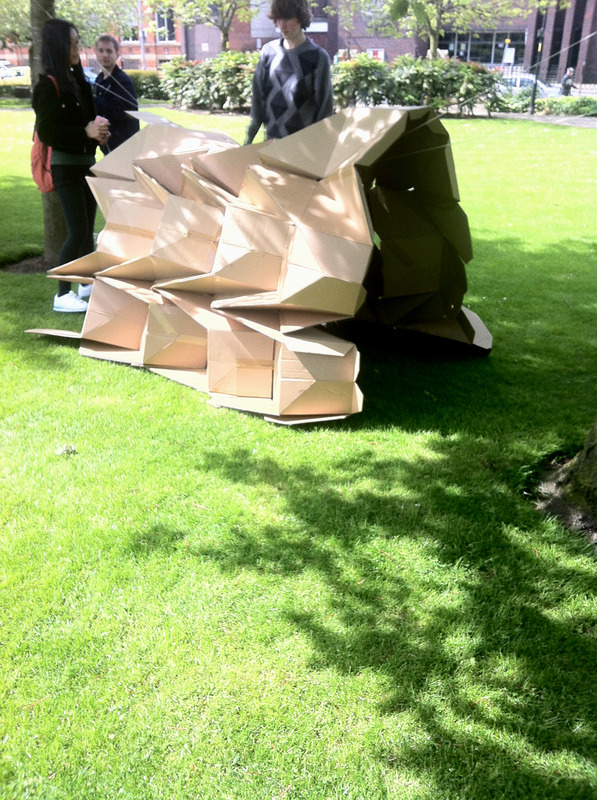
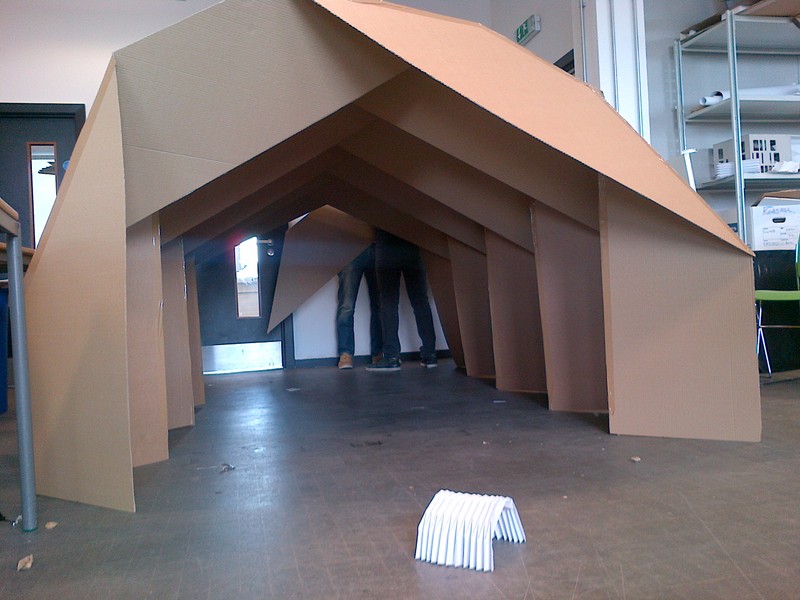
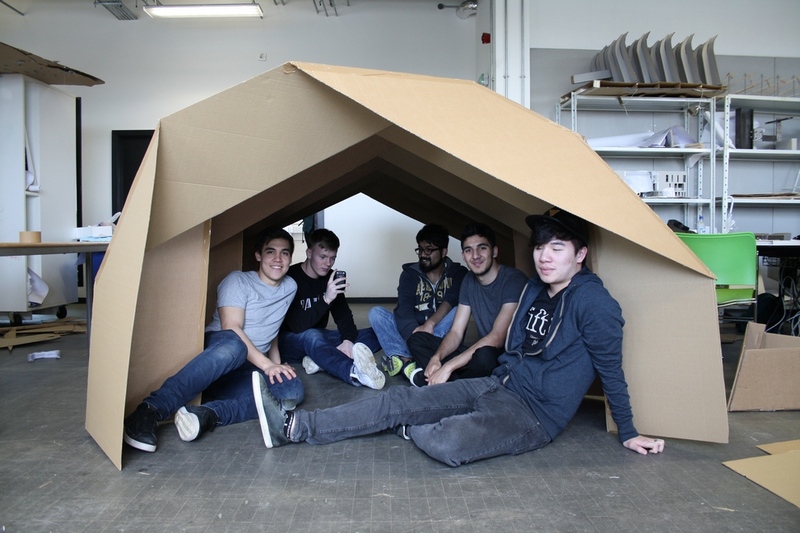
DAY 6 // The final 1:1 scale shelter erected. Thought the outcome was great even though we have a few structural and joint issues!!
Posted 16 May 2014 16:39
DAY 6 // We finished the net for our final shelter design. This is the net before it is folded at 1:1 scale.
Posted 16 May 2014 16:35
All designs were tested out on the general public without any instructions. It was nice to see how people approached the situations.
Posted 16 May 2014 01:08
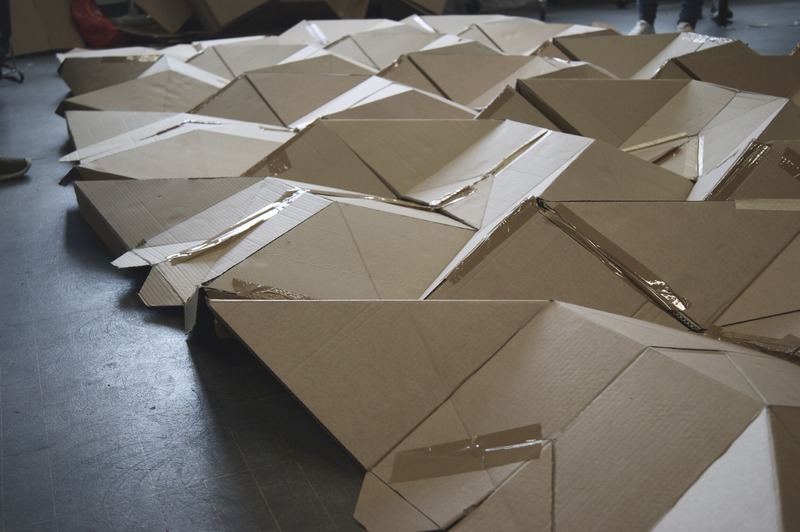
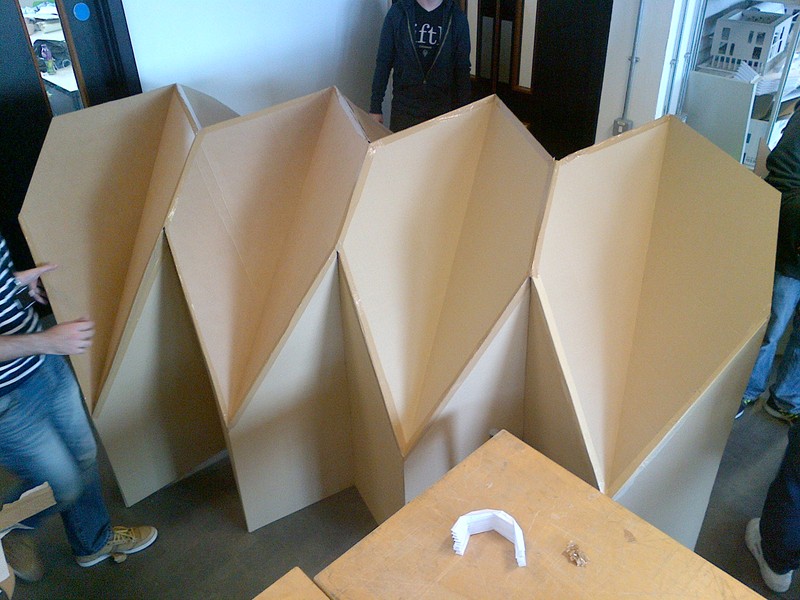
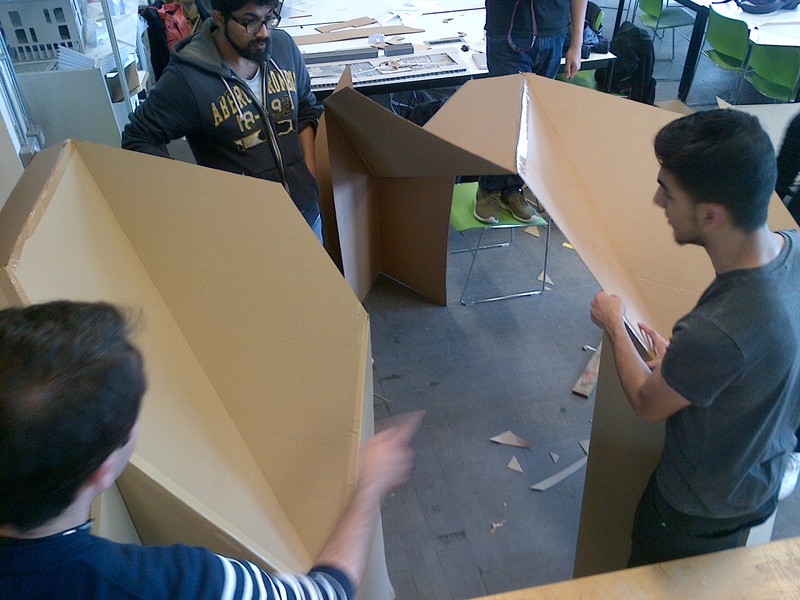
All pieces put together, we realised that cardboard wasn't probably the best option of material due to its rigidity. Lets just say there was a lot of tape involved.
Posted 16 May 2014 00:57
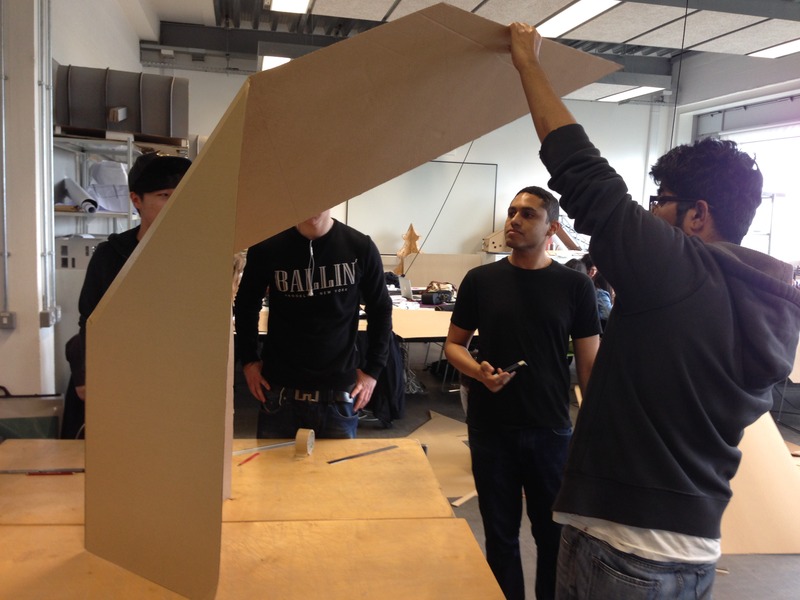
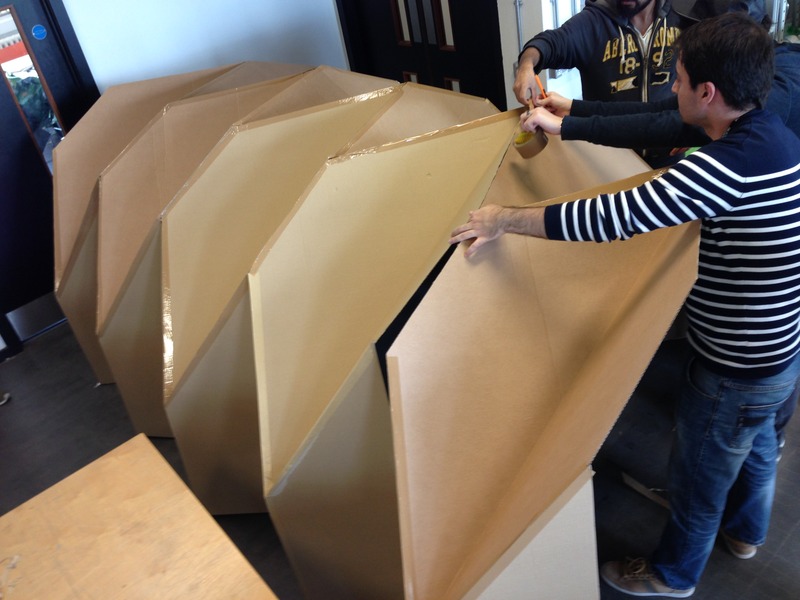
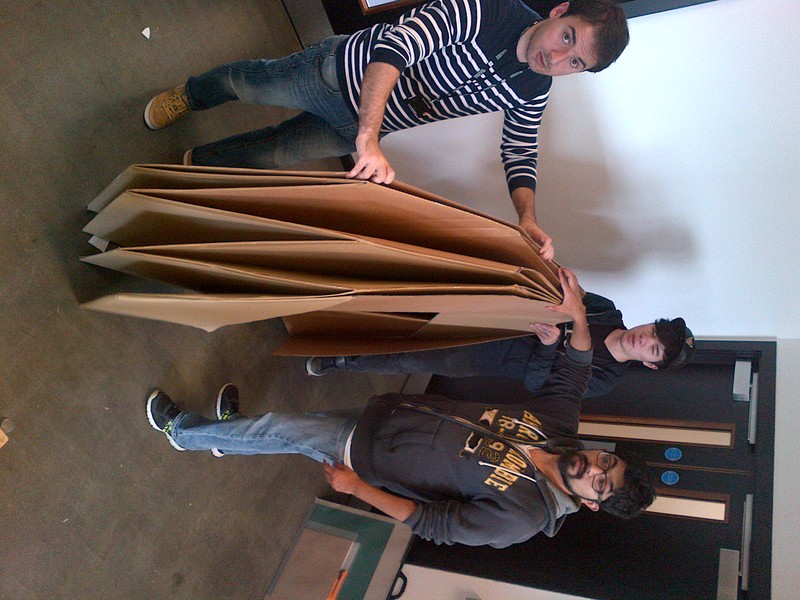
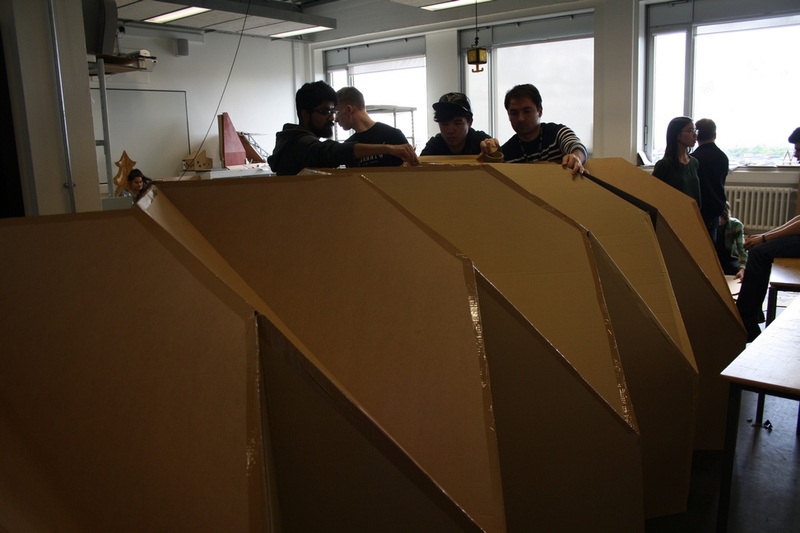
Worked on the most complex design chosen, cutting out 22 cardboard pieces that formed the large 4 metre pop-up tent.
Posted 16 May 2014 00:53
Presentation time! Urun, the second year tutor, along with Fari analysed each design, and provided us with constructive criticism on improving the design to suit the needs. From the 4 presentations, 3 designs were chosen based on simplicity and overall cost and unfortunately the honeycomb structure had a high cost leading to the design being aborted.
Posted 16 May 2014 00:48
Came up with designs for pop-up shelter since there was a change in the original plans of 3D printing a prototype structure. We used the designs from the previous origami session to come up with unique shelter. The idea behind our design was the honey-comb structure and how it can be connected to nearby tents of a similar shape. The structure needed 3 poles in order to be put up.
Posted 16 May 2014 00:39
Introduction to emergency shelters in the morning which provided us with a brief, which required us to design a temporary shelter that could be used by the inhabitants for the length of a year. The afternoon was followed by a session of origami that should link to the shelter. Very informative day !
Posted 16 May 2014 00:31
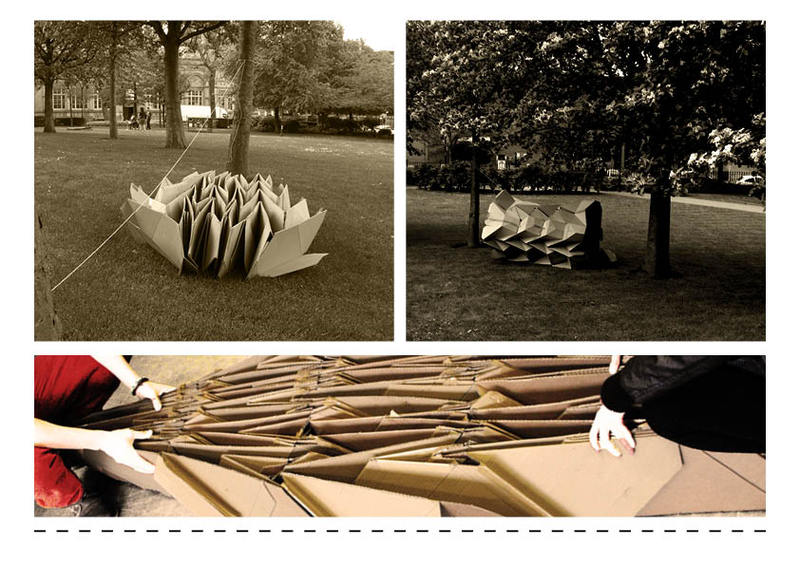
Day 6: We made a small version of our shelter that we can show on the exhibition
Posted 14 May 2014 23:06
Day 5: Volunteers assembling the shelter
Posted 14 May 2014 23:00
we finally tested the models by seeing if members of the public could deploy the structures
Posted 14 May 2014 19:04
we stuck all the pieces together in the origami form to produce the emergency shelter
Posted 14 May 2014 19:00
we cut out the two repeated pieces and used them as templates for the next 8 pieces
Posted 14 May 2014 18:57
we used our maths skills to measure out and scale up the pieces of our model at 1:1
Posted 14 May 2014 18:56
We each decided, in our smaller groups, on specific designs to develop
Posted 14 May 2014 18:54
We started by having a go at making all sorts of crazy origami designs!
Posted 14 May 2014 18:51
After we found a volunteer, he had a go at trying to erect the shelter!
Posted 14 May 2014 18:41
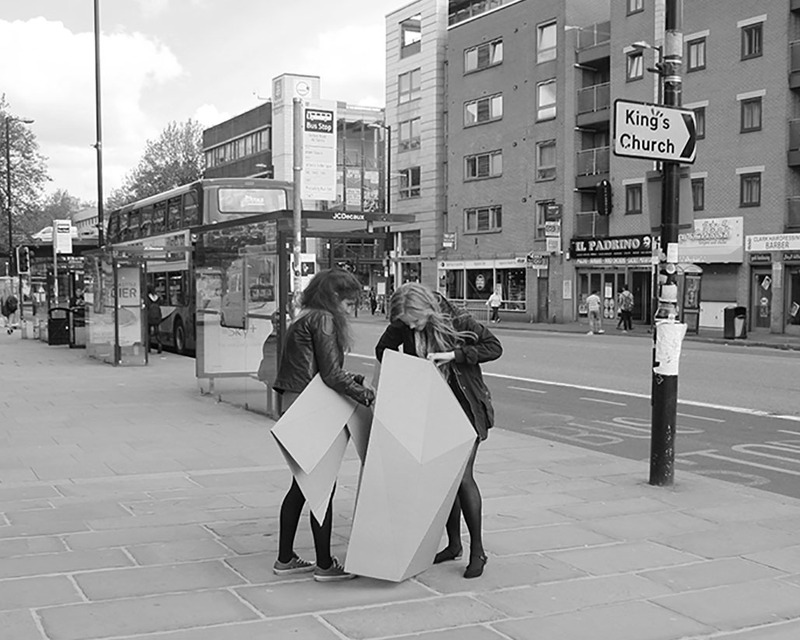
With our temporary shelter ready to test out, we took it to All Saints park and looked around for some people who could have a go at trying to erect the shelter.
Posted 14 May 2014 18:39
The shelter was held up with string against two trees, this kept the arch shape.
Posted 14 May 2014 17:29
A smaller scale of the structure for the exhibition.
Posted 14 May 2014 17:25
We went to All Saints Park to test how easy the shelters would be to assemble with members of the public.
Posted 14 May 2014 17:05
Finished product: from prototype to construction of real shelter
Posted 14 May 2014 14:56
Design completely flat packs for easy transportation
Posted 14 May 2014 14:54
It works! cool little shelter for our disaster relief atelier
Posted 14 May 2014 14:54
Tedious job of joining each segment but we're almost there!
Posted 14 May 2014 14:53
One segment completed at 1:1, another 5 to go!
Posted 14 May 2014 14:51
Helping the guys with their design
Posted 14 May 2014 14:48
1:1 prototype section of joint and how it would work in a real life disaster
Posted 14 May 2014 14:45
Alternative prototype, in case the other design becomes to complex
Posted 14 May 2014 14:44
Day 5: Trying the emergency shelters in Oxford Road to test weather agents
Posted 14 May 2014 14:17
We invited public to experience and share their thoughts with us.
Posted 14 May 2014 14:04
Day 6: testing our shelters with people passing by
Posted 14 May 2014 14:01
Interior2
Posted 14 May 2014 14:00
Public Engagement
Posted 14 May 2014 13:59
Beautiful day to take the models out and test it with members of the public
Posted 14 May 2014 12:35
DAY 6: Final proposal
Posted 13 May 2014 17:53
Comparison to when it is completely flat to folded.
Posted 13 May 2014 16:22
Unfolding, folding and putting up.
Posted 13 May 2014 16:19
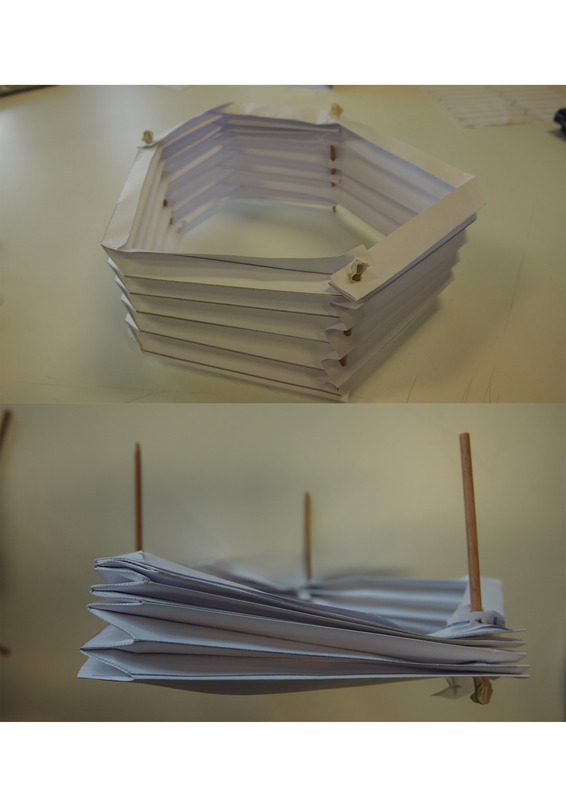
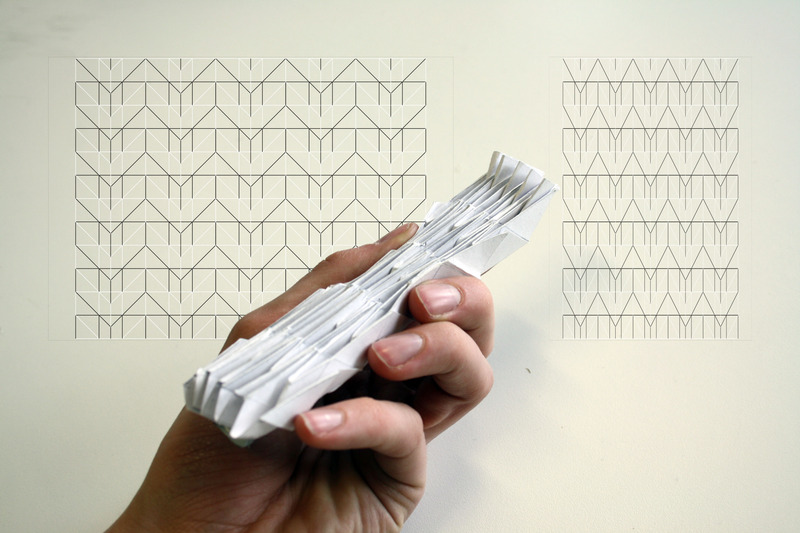
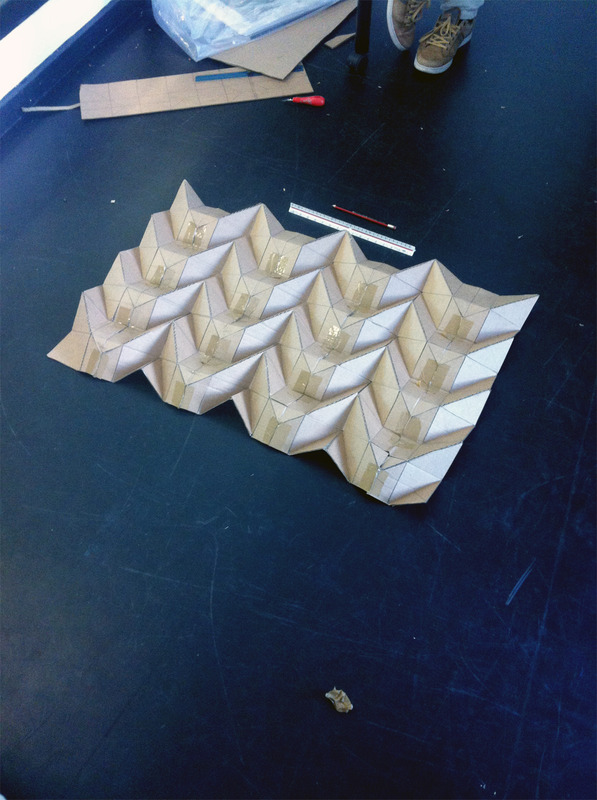
In order to make the structure more compact, added lines were made so that the panels could fold without changing the design again. The illustration shows the extra lines and a paper model was made to test it out.
Posted 13 May 2014 16:07
The different patterns that the shelter could be folded into. First is how it is folded, second is flat and the third is how the shelter would stand in the arch.
Posted 13 May 2014 15:54
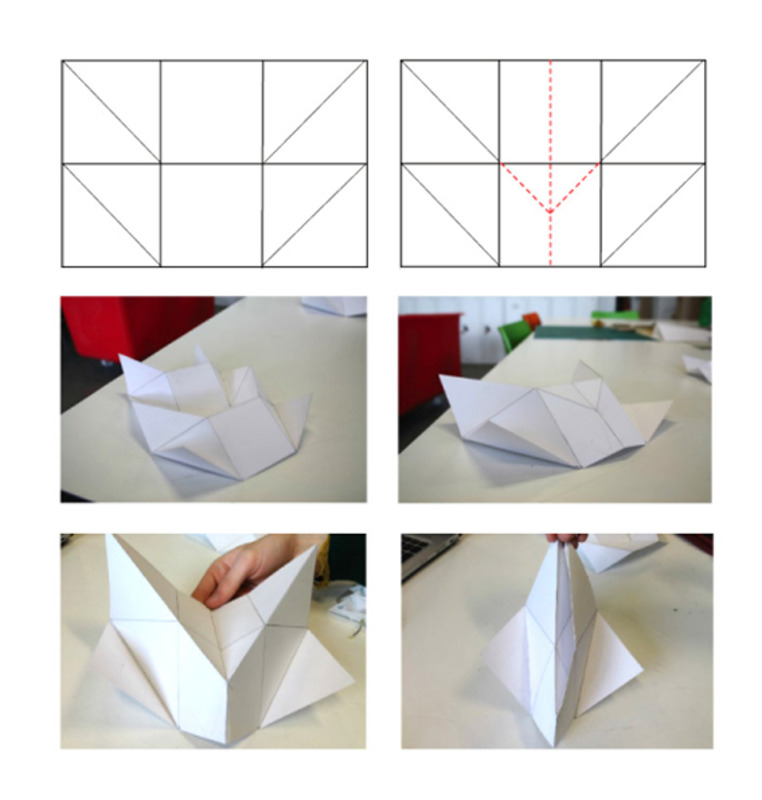
On the second day we fine tuned our design. We found the fold pattern we chose did not go flat enough for the structure to be feasibly transported. To solve this we added a Y shaped fold down the middle of the horizontal folds. This idea came from looking at models we had made on day one.
Posted 13 May 2014 13:27
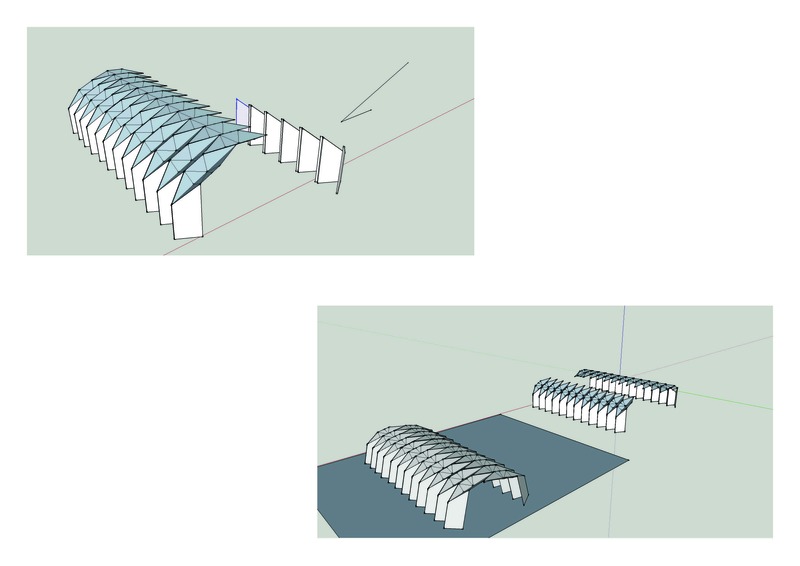
The next step was model our shelter on SketchUp. This helped us present our idea to the group on day three. It also made it easy to show how the design could be expanded.
Posted 13 May 2014 13:26
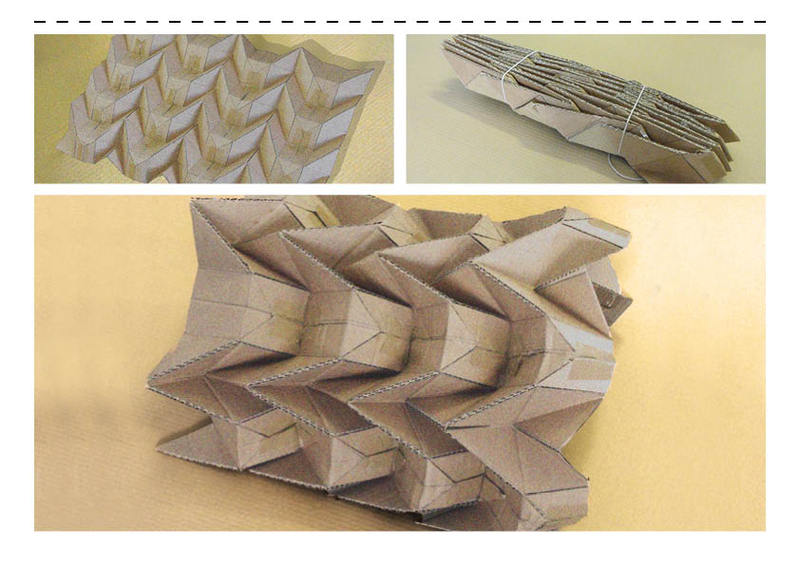
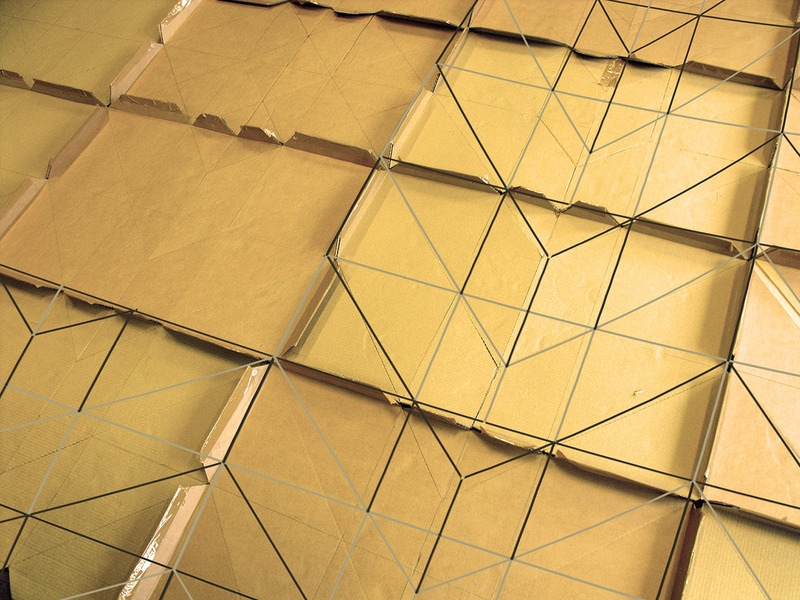
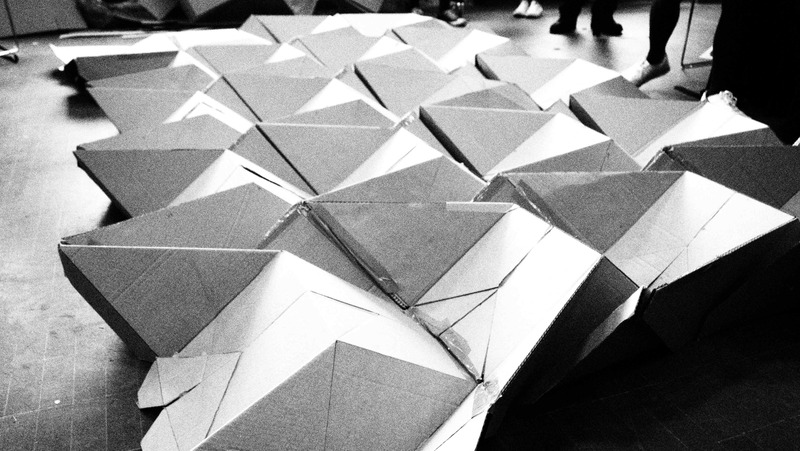
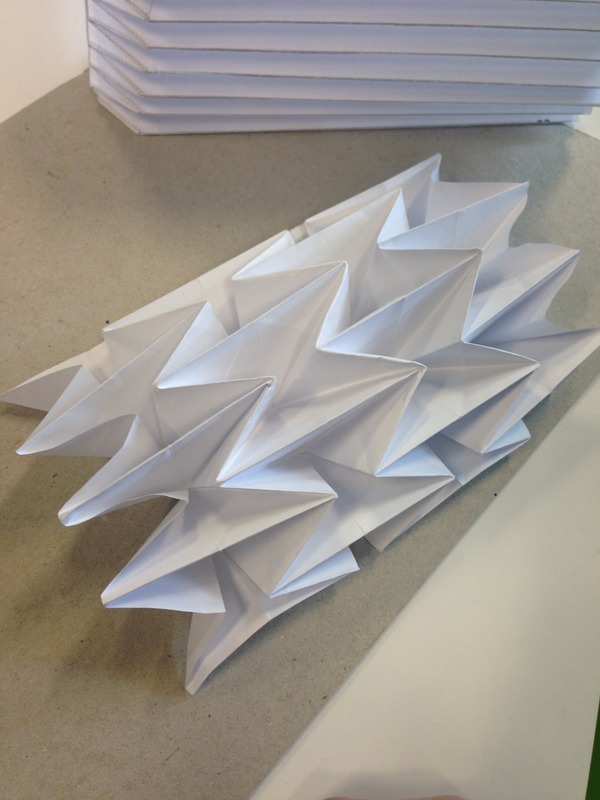
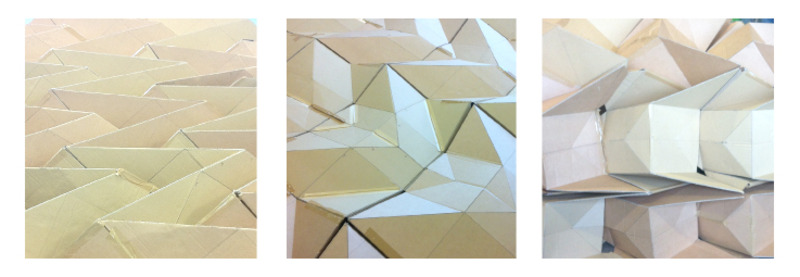
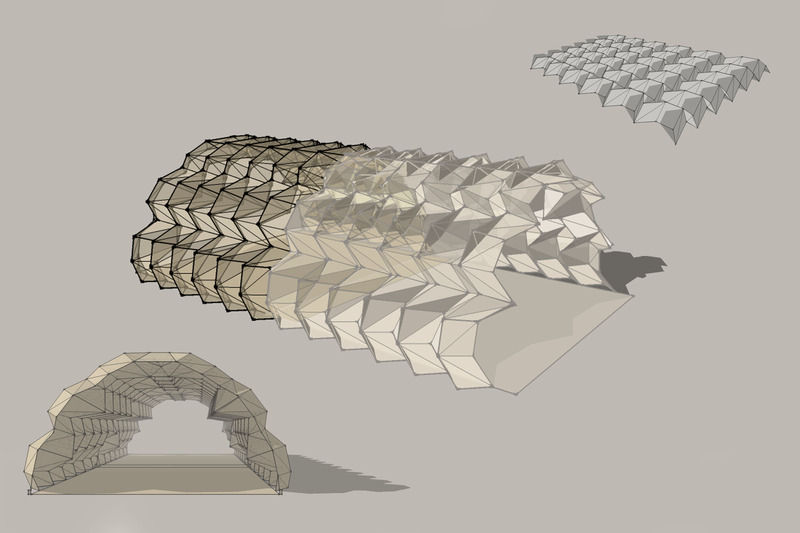
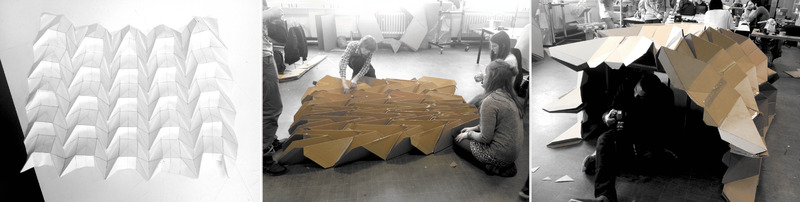
I plan to use this origami surface to develop into a shelter. It looks complex but can easily be divided into a grid and repeated.
Posted 13 May 2014 13:16
Closed
Posted 13 May 2014 13:13
Open
Posted 13 May 2014 13:13
Good job
Posted 13 May 2014 13:12
Scale model and 1:1
Posted 13 May 2014 13:11
Final adjustments
Posted 13 May 2014 13:11
After practicing origami folding techniques on day one, we started applying our shapes into a shelter for after a disaster has struck.
Posted 13 May 2014 13:10
Taping the joints
Posted 13 May 2014 13:10
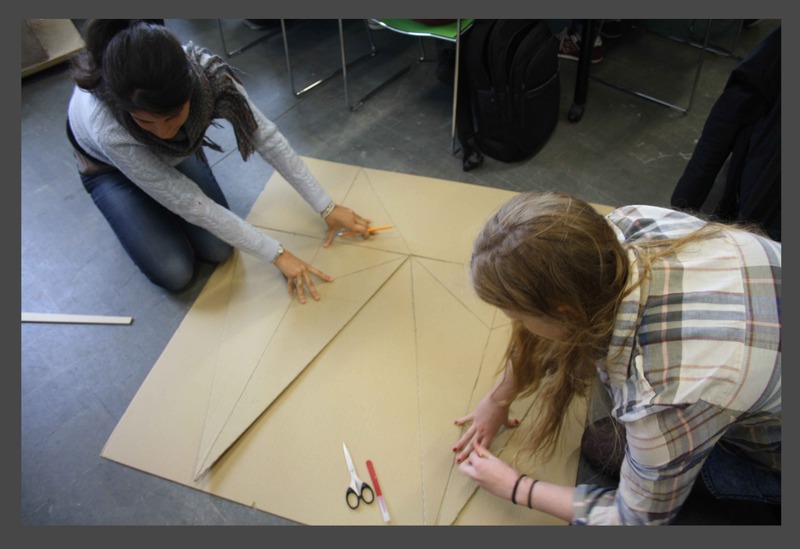
Marking out the shapes from a template
Posted 13 May 2014 13:10
another origami emergency shelter!
Posted 13 May 2014 12:58
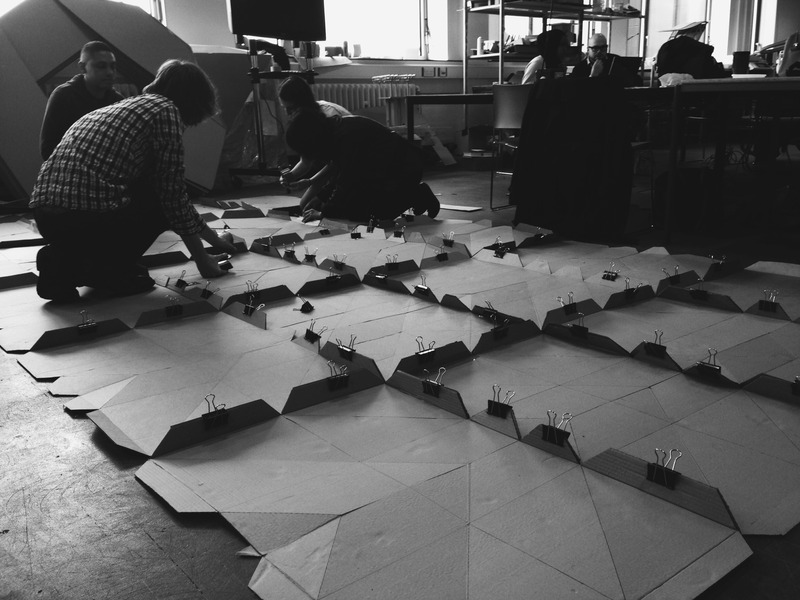
DAY 5 // Today we finished constructing our 1:1 shelter. We had to lay the net out on the floor and staple the tabs together before fully constructing.
Posted 13 May 2014 12:21
Day 4: 1:1 cardboard construction day of emergency shelter
Posted 13 May 2014 10:33